Install guide
See the dedicated oXygen page, it contains an addon site descriptor, understood natively by oXygen.

The XProject plugin for oXygen can be found here (downoad the
latest file named xproject-oxygen-plugin-*.zip). Unzip the archive in your
oXygen install directory, in its subdir plugins. This must result in a subdir
[oxygen]/plugins/xproject/. For instance on Mac OS X, this will typically
result in creating the new directory
/Applications/oxygen-13.2/plugins/xproject/.
The next time you start oXygen, you will have 4 more buttons in the toolbar, named Build, Test, Doc and Release. While editing any file within your project directory, you can click one of those buttons to execute the corresponding XProject target.
Build creates a new package in dist/ based on
src/. Test run the XSpec tests in test/ and place the reports
in the same dir (see the sample project in the ZIP to see how to configure your processors
and XML databases to run the tests), Doc places the XQuery documentation in
dist/xqdoc/, and Release creates a new delivery file in
dist/.
The packages created by Build can be installed automatically in any EXPath Packaging System-compliant system.
Any feedback, help, request for improvement is welcome! Please use the EXPath mailing list. The sources can be found on GitHub.
See the dedicated oXygen page, it contains an addon site descriptor, understood natively by oXygen.
The plugin provides two main entry points: a new toolbar dedicated to XProject, and a set of templates to create new components (using the usual "New File" feature of oXygen). The toolbar contains 5 grey buttons:

The first button creates a new project and the 4 following buttons act on an existing
project. In order to identify an existing project, those buttons look at the file
open in
the current editor window, and select the project it is part of (that is, its ancestor
directory containing a project descriptor xproject/project.xml).

Create new project
Display a file selection dialog box. The user has to type the name of a new directory.
The plugin will create this new directory, as well as two sub-directories (resp.
src/ and xproject/) and the project descriptor. If
everything goes well, it opens the new project descriptor in the editor. The user
can
then edit it as any other XML file, in order to give the project a name, a version
number,
etcetera.

Build project
Create the package for the current project (the package is a XAR file, or a XAW file
if
the current project is a webapp project). The archive is created in the sub-directory
dist/.

Test project
Test the current project. That is, execute the XSpec test suites located in the
sub-directory test/, and generate HTML reports for them. See the main
XProject documentation to learn how to configure test suites to be run by different
and/or
several processors and databases.

Generate project doc
Generate the documentation for the project, based on xqDoc, xquerydoc, XSLStyle and/or oXygen's XSLT documentation vocabulary (only XQuery documentation is support right now).

Build release file for project
Build a ZIP file suitable for delivering the project to end users. The ZIP file contains the package itself (the XAR or XAW file), the project sources, the documentation, a VERSION file, etcetera.
The plugin also adds some templates to the usual "New File" dialog box of oXygen:
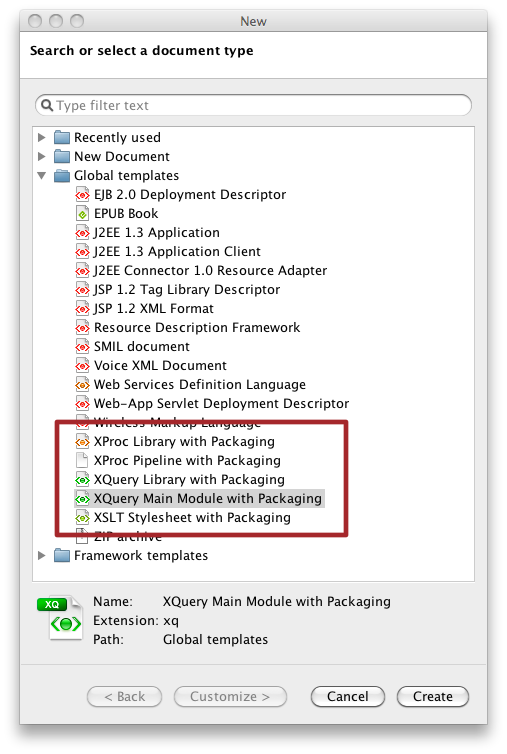
You can locate the new templates in the (long) list either by opening the "Global templates" section or by typing down "packaging" in the filter field at the top of the window. Because this is oXygen, you can also install the templates using any other possible way oXygen is providing to configure templates. For what is worth noting, personally I (Florent Georges) select them once then select them in the "Recently used" section at xthe top of the window....
The new created file contains the declaration for the XProject namespace when applicable, and clearly identified places to adapt to your own code (e.g. the public import URI you want to affect to the new component). Just replace what is specific to your new file and you are ready to develop your component. It will be automatically added to the package the next time you build the project, with the correct import URI!

